|
|
Post by down4derby on Feb 15, 2010 9:00:38 GMT -7
Hey everyone. I was wandering if anybody has any different techniques they use with THE BLOCK. After recieving THE BLOCK and watching the video I realised something while measuring and transfering lines for axle holes. I was pulling all my marks from the pine block wich is not perfectly square. And during measuring and line transfer theres room for error such as pencil type and condition, pencil angle. drift ect. So I thought "how can I square from THE BLOCK instead without using line transfer". I bought a small precision sliding square and drilled 3 tiny holes one above the other 1/16 appart on the bottom edge of the ruler portion at 2 1/4". I then place the square against the front or back of THE BLOCK with the ruler portion on top of THE BLOCK against the side of the pine block wich is clamped in. Next I slide the square ruler in and out for wheel base. The 90 degree angle of the square against THE BLOCK provides in my opinion a more true mark and the guide holes make it fool proof. It transfers your mark from side to side perfectly and quick. Has anyone tried this? Or do you have another method? If you try this make sure it is a small precision sliding square not a cheap one. By the way the holes won`t hurt the performance of the square. W. have you tried this method with the tiny t?
|
|
|
|
Post by W Racing on Feb 15, 2010 21:28:48 GMT -7
I haven't tried that...
Sounds cool. One thing that I do as do many others...
I don't move the fence when drilling the rears. that way the height is always the height you drilled the other one at... If that makes sense...
|
|
|
|
Post by down4derby on Feb 16, 2010 9:16:53 GMT -7
Hi, I thought of two other possible benefits when using this method. First it might provide an easy reference for axle locations during certain builds. For instance the measurement where you drilled the guide holes on the slide square can be recorded on the bottom of the car for reference on future builds. You could drill a series of guide hole hieghts for different builds. Another possible benefit could be if you want to re drill holes for a built car as transfering marks on a built car can be inaccurate depending on body style. Is this a good idea? Maybe someone can try it and get back to me. Thank you.
|
|
|
|
Post by Wood Butcher Racing on Feb 18, 2010 8:49:42 GMT -7
A couple things come to mind. Incra makes some very good measuring tools in lots of styles and sizes. These rules have small holes that a mech pencil fit in and makes it easy to be accurate. I saw a thread recently about a small T square in the $20 range that can help when transfering lines. They also have a bent ruler that can mark 2 sides at once. Pretty cool  |
|
|
|
Post by down4derby on Feb 18, 2010 10:06:47 GMT -7
I was wandering if any of those incra tools can be used to mark your holes squaring from THE BLOCK with your pine clamped in vs marking your holes squaring from the pine block then clamping it in THE BLOCK. My thought is to pull your marks from the perfectly square surface of THE BLOCK instead of the pine block also eliminating the line transfer process.
|
|
|
|
Post by W Racing on Feb 18, 2010 20:31:03 GMT -7
I was wandering if any of those incra tools can be used to mark your holes squaring from THE BLOCK with your pine clamped in vs marking your holes squaring from the pine block then clamping it in THE BLOCK. My thought is to pull your marks from the perfectly square surface of THE BLOCK instead of the pine block also eliminating the line transfer process. I think you could hit the axle locations front to back. The axle height might be tricky. |
|
|
|
Post by Wood Butcher Racing on Feb 23, 2010 6:33:10 GMT -7
I suppose the BLOCK could be marked with different wheelbase dimentions. You could place masking tape across it, but that will have a small effect on the squareness it will present to the table. Maybe you can paint it or engrave it. Maybe Them Jewkes boys will change up the graphics and include a scale on it ...
I have been trying to come up with a jig that would eliminate the need for marking the bodies for the wheelbase layouts. So far nothing has worked as I thought it would. The main problem is the use of C clamps to hold the work piece to the block. I do have a suggestion for a different way to do this - if anyone is listening. If the block were 1" longer, a hole or slot would allow a bolt to hold the body instead of seperate clamps. These bolts would have a "hook" to clamp down the body, and the head side can be recesed into the block allowing any type of fence to be used.
I think I can mock up a prototype in wood if anyone is interested.
My original idea for a jig uses aluminum slot track and a pair of stops to set a width. Then using spacer blocks, the block can slide back and forth to drill the wheel base. Using shims between the fence and the block will control the depth of the hole you make without moving your fence. If it werent for those pesky C clamps getting in the way, I would have finished one already.
By the time I have finished this post I have drawn up a new one! I will try it tonight.
|
|
|
|
Post by down4derby on Feb 23, 2010 7:36:51 GMT -7
Hey, Woodbutcher it seems you understand where I`m coming from as far as squaring from THE BLOCK. The jig/template I came up with is very simple and the clamps don`t get in way. I think to fully understand the technique I use with the sliding square you need to get one and drill the holes in it. Place it against the back of THE BLOCK and lay the ruler portion on top against the side of the pine block. If your clamps are in the way maybe they are too wide or not centered. I use small bar clamps. The main idea is to eliminate human error and skip line tranfer and the template moves your mark from side to side accuratly. The sliding portion of the square is to adjust wheel base. I need to figure out how to post a pick.
|
|
|
|
Post by Wood Butcher Racing on Feb 23, 2010 8:05:08 GMT -7
Hey, Woodbutcher it seems you understand where I`m coming from as far as squaring from THE BLOCK. The jig/template I came up with is very simple and the clamps don`t get in way. I think to fully understand the technique I use with the sliding square you need to get one and drill the holes in it. Place it against the back of THE BLOCK and lay the ruler portion on top against the side of the pine block. If your clamps are in the way maybe they are too wide or not centered. I use small bar clamps. The main idea is to eliminate human error and skip line tranfer and the template moves your mark from side to side accuratly. The sliding portion of the square is to adjust wheel base. I need to figure out how to post a pick. Yes, I would like to see what you're doing. I think there are some threads on posting pictures, but I use photobucket. All you have to do is copy the url (I think) and paste it your post. |
|
|
|
Post by down4derby on Feb 24, 2010 7:56:30 GMT -7
|
|
|
|
Post by down4derby on Feb 24, 2010 9:18:09 GMT -7
|
|
|
|
Post by 2FAST4U on Feb 24, 2010 10:04:02 GMT -7
you boys are trying to reinvent the wheel here... lol you do not need to worry about, if you drilled your holes exactly .000001 across from each other. it will be OK if you do not. all the holes will be drilled parallel with each other and this is the most important part of your alignment. the axles can be off set from each other and still produce a fast car. get the axles as close as you can. the way I show you in the video is all you have to do. moving the fence is OK to do... set your rear wheels height where you want them then drill, then move the fence for you Dom wheel then drill and then move the fence for you lifted wheel then drill. it is that easy. you boys are going beyond where you need to go, do not beat your self up on this.  just trying to help out...   ;D 2fast4u |
|
|
|
Post by Wood Butcher Racing on Feb 24, 2010 11:08:57 GMT -7
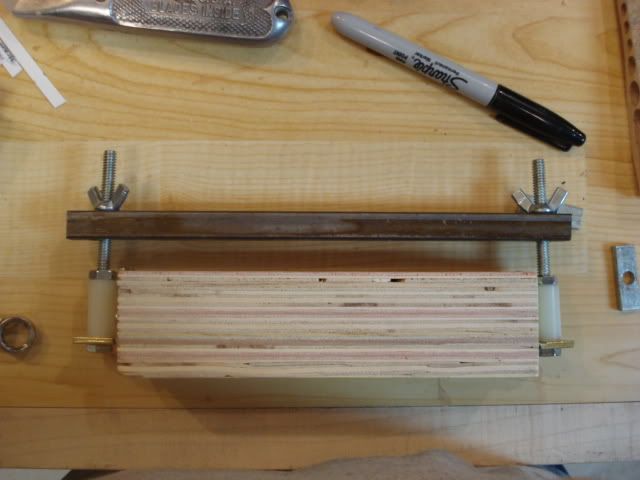
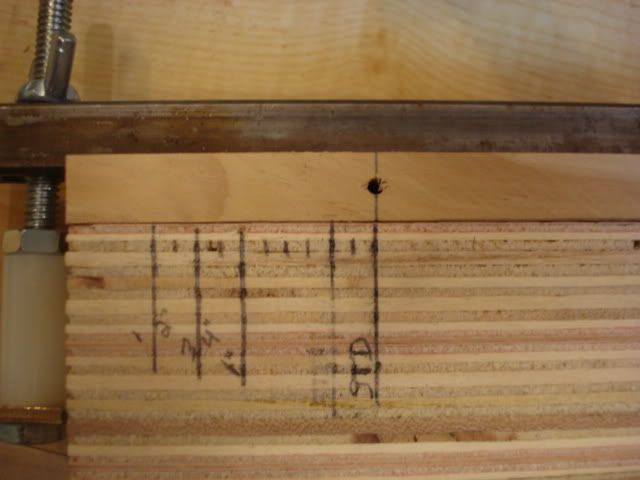
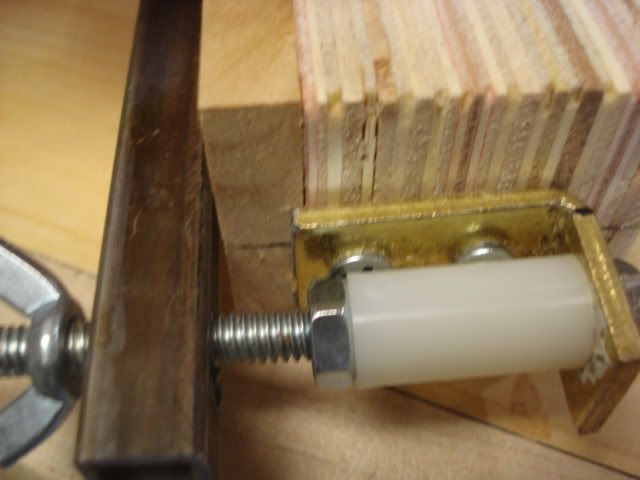
Glenn, you're too late!!  You are absolutely right, though. The precision comes from a true drill press, and the block is a way to hold the work peice for drilling the holes. The pencil layout is just that. It gets you in the right place. And techincally speaking, you don't even need the fence, but it does allow you to easily place your work for repeatability. Now the process you describe has you moving the fence 3 times. Wouldn't it be nice to know how much it has moved for each step? By leaving the fence in 1 place and using spacers you can. Spacers made up of cominations of 1/8, 1/16, 1/32, and even 1/64 allow you to do just that. Simply place them between the block and the fence and pull them out until your done. Easy, exact, and repeatable. I did mock up the clamping thing for the block and added a scale that would look something like this. It's a little crude, but everything I used came from the pieces bin ... Bolts are tight to the brackets. Wingnuts allow for tool free tightening. Everything is contained on the sides allowing for use of any type of fence.    |
|
|
|
Post by psycaz on Feb 24, 2010 12:16:15 GMT -7
you boys are trying to reinvent the wheel here... lol you do not need to worry about, if you drilled your holes exactly .000001 across from each other. it will be OK if you do not. all the holes will be drilled parallel with each other and this is the most important part of your alignment. the axles can be off set from each other and still produce a fast car. get the axles as close as you can. the way I show you in the video is all you have to do. moving the fence is OK to do... set your rear wheels height where you want them then drill, then move the fence for you Dom wheel then drill and then move the fence for you lifted wheel then drill. it is that easy. you boys are going beyond where you need to go, do not beat your self up on this.  just trying to help out...   ;D 2fast4u does what you say above apply to using the the BLACK block or the BLUE block??  Hey Mood, From the prior pictures it must be Blue since they are using the Black one. ;D Take wood, slide wood, clamp wood, drill wood. The Blue Blcok makes it simplier than can be. |
|
|
|
Post by down4derby on Feb 24, 2010 13:11:37 GMT -7
Someone should at least try it. Who knows, you might like it!
|
|